Logging into the CBS microdata environment (macOS)

This guide provides instructions for establishing a secure connection to the CBS microdata environment on a macOS system, utilizing a VPN and RSA tokens for authentication. Separate instructions are available for Windows users.
Preparation and System Requirements
Before initiating a session in the CBS microdata environment, ensure your workstation meets the following criteria:
1. VPN Client:
The VPN client provided by CBS must be installed on your workstation. If it is not installed, please install the VPN client
2. Omnissa Horizon Client:
Install the latest version of the Omnissa Horizon Client. Select the most recent version and follow the instructions to download and install the client.
3. System Requirements:
- The system used to access the CBS microdata environment must comply with CBS's T-1 guidelines.
- CBS enforces a T-1 policy, meaning the Horizon Client and the operating system must meet specific requirements. More information is available on the CBS microdata environment information page.
4. Required Internet Connectivity:
- IPSEC and IKE (UDP on port 500)
- FW1_scv_keep_alive (UDP port 18233)
- HTTPS (TCP 443)
Establishing a VPN Connection with the FortiVPN Client
Before accessing the CBS microdata environment, you must establish a VPN connection with CBS. Follow these steps:
1. Launch the FortiVPN client on your laptop or desktop.

2. For RSA Hardware Token Users:
- Username: Enter your 4-letter username (without @remoteaccess.cbs.nl).
- Password: Enter your PIN code followed by the RSA token code (without the plus sign).
3. For RSA Software Token Users:
- Start the RSA application on your mobile device.
- In the FortiVPN client, enter your 4-letter username in the Username field.
- Enter your personal PIN in the RSA app and press Submit.

- Enter the generated 8-digit token code in the Password field of the FortiVPN client and click Connect.

Important Notes for Software Token Users:
4. Once the VPN connection with CBS is established, all internet and network connections are blocked except access to the CBS microdata environment. Other network locations will no longer be accessible.

Only the CBS microdata environment is accessible. All other internet and network addresses remain unreachable until the VPN connection is terminated.
Configuring Omnissa Horizon Client and Connecting to the CBS microdata environment
The initial configuration of the Omnissa client is essential when using it for the first time. Follow these steps:
1. Establish the VPN Connection: Ensure the VPN connection is active using the FortiVPN client before proceeding.

2. Open Omnissa Horizon Client: If you haven't installed Omnissa Horizon Client yet, follow the installation instructions provided earlier.
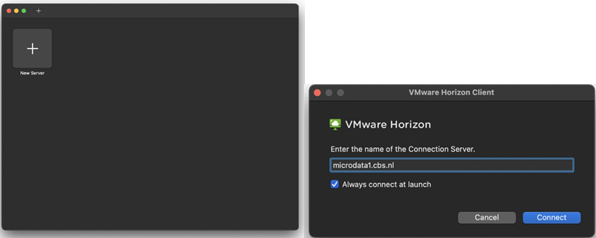
3. Add Server: Click on "Add Server," enter microdata1.cbs.nl as the server address, and click "Connect."
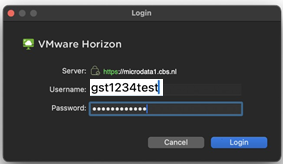
4. Enter Credentials:
- Username: Enter your Microdata account name (e.g., gst1234test).
- RSA Passcode: Enter your 4-digit Project PIN code (e.g., if your account is gst1234test, the Project PIN code is 1234).
- Click "Login."

5. You will receive an SMS with an 8-digit verification code. Enter this code in the next screen and click "Login."

6. Enter the password of your Microdata account and click "Login."
7. Start a Desktop Session: You are now logged into the CBS microdata environment. To start a desktop session, double-click on the desired environment. For applications like MATLAB and SAS, a separate application session must be started.

8. After logging in, a window will appear counting down. Once this window disappears, the applications are ready for use.

Additional Information
CTRL + ALT + DEL
If the session is locked and prompts you to press CTRL + ALT + DEL, do not use the keys on your keyboard. On a Windows computer, click the CTRL + ALT + DEL button in the gray top bar of Omnissa Horizon Client to unlock the session. On macOS, click "Connection" in the top bar and select "Send Ctrl-Alt-Del" to unlock the session.

Creating Shortcuts
You can create shortcuts to applications on your desktop as an alternative to the favorites list in the tile interface. Open the Start menu by clicking the Start button at the bottom left corner. Click on "All apps" to open a list of available applications. Drag the desired applications from this list to your desktop to create shortcuts.
Disconnecting the Session
If you have ongoing scripts or processes that need to continue running, you can disconnect from the session without logging off. To do this, click the Close button in the corner of the window. This action disconnects your session but keeps it active on the server, allowing processes to continue running.

Logging Off the Session
When you have finished your work and saved all your data, it's recommended to log off your session to maintain system stability. You can do this via the Start menu within your remote desktop:
- Click on the Start button in the lower-left corner of the remote desktop.
- Click on your user icon (a gray circle with a person figure).
- Click on the three dots (...) to open additional options.
- Select Sign out to log off your session.
